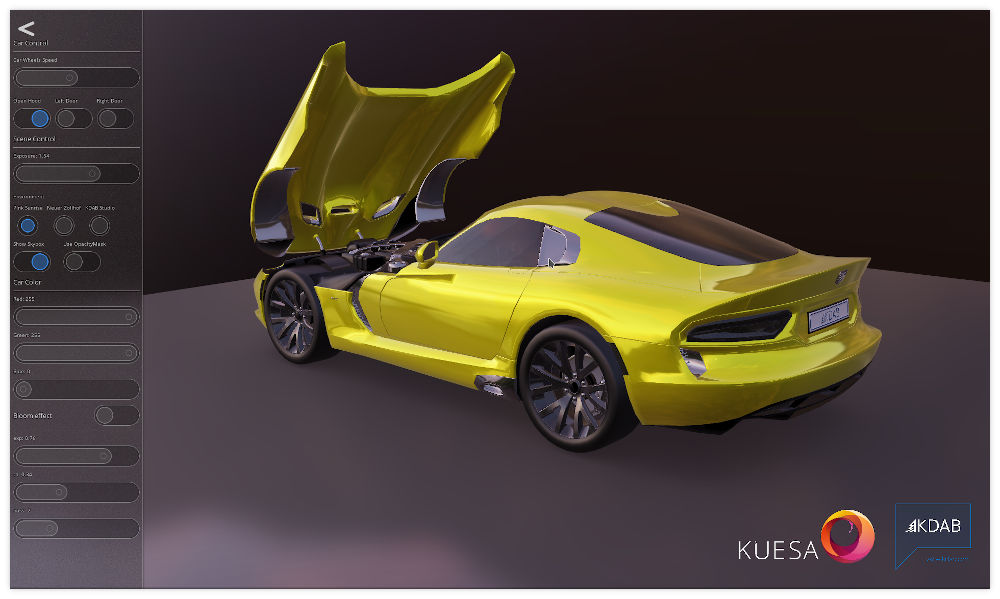
Kuesa Car-Scene QML Example
Demonstrates the use of the Kuesa API to import a glTF2 file and extract assets from it.
QtQuick and Qt3D integration
The car-scene example relies on the regular QtQuick and Qt 3D APIs to instantiate a QtQuick based application that combines Qt 3D based content with a 2D UI overlay.
 1
 2
 3
 4
 5
 6
 7
 8
 9
10
11
12
13
14
15
16
17
18
19
20
21
22
23
24
25
26
27
28 | Item {
id: mainRoot
// 3D Content
Material.theme: Material.Dark
Material.accent: Material.Blue
Item {
id: baseUI
anchors.fill: parent
Wind {
id: wind
anchors.fill: parent
visible: menu.useOpacityMask
}
Scene3D {
id: scene3D
anchors.fill: parent
focus: true
multisample: true
aspects: ["input", "animation", "logic"]
// Root Scene Entity
MainScene {
id: sceneContent
|
Filename: car-scene/qml/main.qml
SceneEntity
Kuesa provides the [SceneEntity ] element which holds collections of Qt 3D assets accessible by name.
| import Kuesa 2.0 as Kuesa
import Kuesa.Effects 2.0 as Effects
Kuesa.SceneEntity {
id: scene
|
Filename: car-scene/qml/MainScene.qml
Importing a glTF2 File
In order to load a glTF2 file, Kuesa provides the [GLTF2Importer ] element. If the sceneEntity property is set to a valid [SceneEntity ] instance, Qt 3D assets generated while parsing the file will be automatically added to the various asset collections.
| // Loads GLTF 2.0 asset
Kuesa.GLTF2Importer {
sceneEntity: scene
source: "file:" + _assetsDir + "/models/car/DodgeViper" + _modelSuffix + ".gltf"
}
|
Filename: car-scene/qml/MainScene.qml
Usually, you will want to interact with some elements of your scene. The [Asset ] element allows to retrieve an asset by name. If the asset for a given name really exist in the specified collection, the node property allows you to access the underlying asset instance.
You can use the Kuesa Studio gltfInspector to introspect a glTF2 scene files and find the names of the various assets it contains.
For instance you might want to select a Camera by name.
| Kuesa.Asset {
id: sweepCam
collection: scene.cameras
name: "SweepCam"
}
|
Filename: car-scene/qml/MainScene.qml
Once retrieved, you can create binding on some of the Camera properties.
| QQ2.Binding {
target: sweepCam.node
property: "aspectRatio"
value: mainCamera.aspectRatio
}
|
Filename: car-scene/qml/MainScene.qml
Similarly you could retrieve a Material asset
1
2
3
4
5
6
7
8
9
10
11
12 | // We create a baseColorFactor property. If the property exists in the node, it will be a proxy of the node property
// When we set the qml property, the node property will be updated accordingly
// When the node property is updated in C++, the qml property will be updated
// As soon as the node is changed, the qml property is updated if it has a C++ equivalent
Kuesa.Asset {
property color baseColorFactor: scene.carBaseColorFactor
id: carMaterial
collection: scene.materials
name: "Mat_CarPaint"
onBaseColorFactorChanged: console.log("Binding 1 works. Color: " + baseColorFactor)
onNodeChanged: scene.carBaseColorFactor = carMaterial.baseColorFactor
}
|
Filename: car-scene/qml/MainScene.qml
And create a binding on its properties to control the appearance of elements in the scene that use that material.
| property var baseColorFactorProp: carMaterial.baseColorFactor
onBaseColorFactorPropChanged: console.log("Binding 2 works. Color: " + baseColorFactorProp)
|
Filename: car-scene/qml/MainScene.qml
Playing Animations
The [AnimationPlayer ] allows to control the playback of animation clips that can be retrieve by name.
1
2
3
4
5
6
7
8
9
10
11
12
13
14
15
16
17
18
19
20 | Kuesa.AnimationPlayer {
id: hoodAnimator
sceneEntity: scene
clock: Clock { }
clip: "HoodAction"
}
Kuesa.AnimationPlayer {
id: leftDoorAnimator
sceneEntity: scene
clock: Clock { }
clip: "DoorLAction"
}
Kuesa.AnimationPlayer {
id: rightDoorAnimator
sceneEntity: scene
clock: Clock { }
clip: "DoorRAction"
}
|
Filename: car-scene/qml/MainScene.qml
Adding Post Processing Effects
First you need to instantiate the effects you want to use.
1
2
3
4
5
6
7
8
9
10
11
12
13
14 | Effects.OpacityMask {
id: opacityMaskEffect
mask: TextureLoader {
source: "qrc:/opacity_mask.png";
generateMipMaps: false
}
premultipliedAlpha: true // This is what Scene3D/QtQuick expects
}
Effects.BloomEffect {
id: bloomFx
threshold: 0.34
blurPassCount: 2
}
|
Filename: car-scene/qml/MainScene.qml
Once you have created the effects, they need to be added to the [ForwardRenderer ] FrameGraph. The order in which they are added dictates the order in which they are applied.
1
2
3
4
5
6
7
8
9
10
11
12
13
14
15
16
17
18
19 | RenderSettings {
// FrameGraph
activeFrameGraph: Kuesa.ForwardRenderer {
id: frameGraph
camera: scene.animated && sweepCam.node ? sweepCam.node : mainCamera
postProcessingEffects: {
var effects = []
if (useBloomEffect)
effects.push(bloomFx)
if (useOpacityMask)
effects.push(opacityMaskEffect)
return effects
}
skinning: showSkybox
backToFrontSorting: true
toneMappingAlgorithm: Effects.ToneMappingAndGammaCorrectionEffect.Reinhard
// showDebugOverlay: true
}
},
|
Filename: car-scene/qml/MainScene.qml
Updated on 2023-07-03 at 11:02:17 +0000